tips and techniques...
When
I see a new idea or technique I enjoy learning how its done,
and for all the other beginners out there here are some simplified
instructions and graphics for some of those ideas, and
the basic instructions for tubular peyote!
You will need Adobe Acrobat Reader to open and print these files.
HOW TO GET THAT SOFT
AND FLEXIBLE FEEL
(for circular peyote beadweaving using a form)
One of the hardest things to learn about beadweaving is how to
get that soft and flexible feel to your work. Most often when
starting out it has a very stiff brocade kind of feel. Sometimes
this is preferable depending upon the application. To achieve
a softer more flexible feel, try this tip.
Standard Form
Sizing:
You will need an initial base of card stock or a manila file folder. You could also use a toilet paper roll for a small design, 86 beads across or less and shorter than 4" or if it's larger a paper towel roll. I find the card stock or manila file folder the best.
- String your first row of beads and making it into a loop
- Roll the card stock and slide the loop over one end
- Keep it near the BOTTOM edge, put a small pice of tape on the seam
- Slide the beads
to the MIDDLE, tape the seam
- Slide the beads to the TOP edge, tape the seam
- Slide the beads off and tape the
edge of the form shut
- STUFF the form with newspaper or shredded paper, make sure it ends up as firm as a stick.
NO SQUISHY.
- Tape over the ends so the stuffing can't fall out.
Now for the tip:
If you were to use this form
as is, your piece would come out too tight. It would never flatten and you'd end up with a permanent TUBE.
Use another piece of card stock or index card
(like a recipe card or use the inserts in magazines, you know
those anoying sign-up cards? They actually come in handy!) and
ROLL it around your form tightly.
TAPE it firmly along
the edge, you will need it to go around at least TWICE
If your
form is small,
cut off the excess first before taping shut. This will give
you the necessary space to keep your beadweaving from being too
tight.
There should be AT LEAST a 4 bead GAP for designs 80 beads or less around, up to a 6 bead gap for a piece up to 100-110 beads around.
 Once you slide your
bead loop back on, don't worry, when you finish your third row, make sure to even out the spacing all the way around. If you still have a gap where you step-up. Move the beads over to close it and move each column of beads just a smidge to even out the spacing around the form. Once you slide your
bead loop back on, don't worry, when you finish your third row, make sure to even out the spacing all the way around. If you still have a gap where you step-up. Move the beads over to close it and move each column of beads just a smidge to even out the spacing around the form.
Now when you finish and slide your piece off, it has the flexibility to be
flattened and still feel soft.
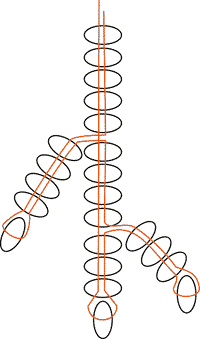
BRANCH FRINGE
"Branch" fringe which has wonderful applications for
different designs.
Add beads to desired length.
Go back up to where you want the first
"branch." Usually 4 - 6 beads or more depending on
how dense you want your fringe to be.
Eay embellishment ideas, add a larger or
unique bead on the end of each branch, use different colored
end beads, or diferent colored branches.
Print page
for future reference.
|