|
|
||
|
Trouble Just
Getting Stared!
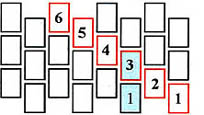
Each row is only 1/2 a step up from the next, so as you look
at the chart, the first row is the very bottom most row, the
second is only halfway up, the third sits directly on top of
your first row (blue beads). STEP 1:
Threading the Needle and
GETTING STARTED TIP: Instead of following the pattern now, which is always tricky for the beginner. Alternate stringing ONE WHITE, ONE BLACK bead for the total number of beads across your pattern. Or any two very different colors. By doing this, not only is it easier to make sure you've strung the correct number of beads, it will make your third row a breeze! The beads WILL BE in a straight line, the up and down happens when you start to string your third row.
You can create a form by using a 2-liter soda bottle or toilet paper roll, depending on the size of your project. Once you've made your loop, roll the bottle or toilet paper tube up just a bit smaller to fit inside the loop. Hold the beads snug and tape one end of the tube, slide up to the opposite side and tape it too. Then slide the beads off and tape the whole tube together so it doesn't come apart. (NOTE: you need to build in extra space to keep your project flexible, if you don't it will be stiff and not soft and flowing. See Tech Tips for details. If you're using one of my patterns, you should have a quick start pattern to tape together, the tube will fit inside that and be the right size. Pull the thread snuggly around the form by pulling in the SAME DIRECTION as you are beading, i.e. right-handed people will actually be pulling to the left, and left-handed people to the right. Never pull towards you or opposite the direction you are beading, you will only LOOSEN the beads! This is something that happens quite a lot with beginning beaders, they wish to look at what they're doing and "unconsiously" pull the thread back and away to see the beads!
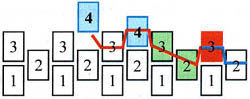
Look to see where your thread is coming out. Is it a WHITE or BLACK bead next? Let's say it's a BLACK bead next . . . pick-up ONE BLACK bead, and GO THROUGH THE WHITE on the other side. Your black bead should be stacked ON TOP of the black bead below, and you should have gone through the white bead. REPEAT, pick up a BLACK BEAD, GO THROUGH the WHITE. You should start seeing the pattern now, Black on Black, going through the Whites. This is the hardest part of peyote stitch, people have a hard time seeing which bead to go INTO next. This takes all the guess work out, you should be stacking the same colors on each other and going THROUGH the other colored bead. Step
5: Stepping Up to the Next Row Once you have completed a full row, the last bead of the row (RED bead), you'll need toSTEP-UP (RED line) to your next row by sewing through the Row 2 and Row 3 beads (GREEN beads). Now that you've finished your first three rows, the weave has begun, you can now just start following your pattern. Once you've completed several rows, you can cut the stop bead off and unstring the cheater row, or wait until you've finished the project, then unstring it and use the thread to close up the bottom! |

 How to Count Rows
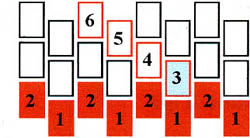 STEP
2: Stringing Your First Row
STEP
2: Stringing Your First Row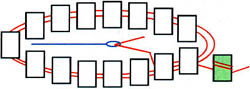 STEP
3: Sew Beads into a Circle
STEP
3: Sew Beads into a Circle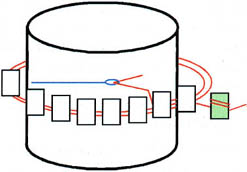 Because we are not following the pattern yet, you can hold
your loop towards the center of the form. Much easier to hang
on to.
Because we are not following the pattern yet, you can hold
your loop towards the center of the form. Much easier to hang
on to.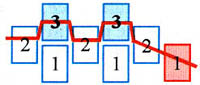 STEP
4: Starting Row Three
STEP
4: Starting Row Three